Monday, July 11, 2011

A Glimpse of the Inside

Now that we are completing most of the work on the first Passive House in Texas it’s time to share a few photos of the dramatic changes that have been made!
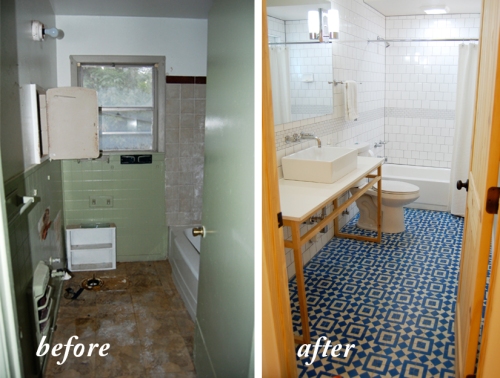
One thing that was exciting for us to reinvent as part of this remodel was the bathrooms.

A dramatic change!


For the guest bathroom above, we used cement tile as the organizing element for our design.  This tile is a modern take on an Arab/Meditteranean design.  The particular creation of these tiles revitalizes an art form that developed in France in the mid-1800′s and quickly spread around the world.  Cement and color pigments are poured into different compartments in a metal mold and then left to cure.  The end result has a bold, vivid color.
Tile Detail

We used cement tiles in our second bathroom as well, but this time we just used a few tiles to create a decorative panel above the sink.   We chose an Arabesque pattern that reminded us of design elements we saw during several trips to the Middle East and the Persian Gulf.  We handmade the counter top out of concrete.
Second bathroom


Moving on, lets take a look at the development of the living room.  As a reminder, here is a taste of what the interior of the house looked like when we first bought it:
What a disaster!

 Because this was a gut rehab, there is really a drastic change from the old design of the house to the finished product.  The roof was bumped up and the footprint of the house was bumped back so in the end, we have much more space than what we started with. 

In the main rooms of the house, we designed a system of indirect lighting that keeps the house bright without any glaring lights shining in ones eyes.  It is difficult to capture this light on film, but take my word that it has an extremely natural feel that is not glarey or intrusive.  The lights are tucked behind wood panels that were salvaged from the old roof of the house.
The livingroom

More pics are on the way soon so stay tuned!

Friday, July 8, 2011

Passive House in HOT Climates

People have been emailing to ask how it’s possible to have a Passive House in Texas, when it was originally designed for a cold European climate.  That is a good question!
Passive House in Hot Climates:

If we look at the basic principles of the Passive House System we can see that they are relevent to every climate.  Minimal air infiltration, minimal energy usage, mechanical ventilation for fresh filtered air, and proper insulation make perfect sense regardless of location.  The differences are found in WHERE your energy will be used (i.e. your heat usage will be almost non-existent and your cooling load will be the challenge).  

The main differences come in the ways we utilize the ERV (what’s an ERV? click here) , and some of the selections we make for water heaters, and appliances.  In colder climates, where the goal is to preserve the heat generated from hot showers, hot water production, range hoods, and clothes dryers ,you would typically find that the ERV is used to re-circulate the warm air from some of those items, and that most of them would be within the thermal envelope of the house.

Here in Texas, it’s been over one hundred degrees for almost a month now, and it’s only July 8th.  So needless to say, we are NOT trying to keep ANY heat in our homes.  We suck the heat from bathrooms and range hoods directly outside using standard equipment, and we try to put washers and dryers someplace outside of the thermal envelope.  Having more penetrations can effect your air leakage, so you need to make sure that all of your penetrations are sealed according to PH requirements.

The main concern I have with using standard equipment becomes “what if someone leaves the fan on??”  In a Passive House, you could suck all of your conditioned air outside, and end up costing yourself extra money in energy costs.  To combat this, we’ve installed 15 minute timers, and bath fans with air flow rates that correspond closely to the size of room that they are in.   This way, even if we max out the timer at 15 minutes, we mostly suck just the heat and humidity out of the room it was created in, and not the cool air from the rest of the house.

When it comes to hot water we have a few options.  Solar is always an option here in Texas, but it’s expensive, may require you to get rid of trees, and also doesn’t remove heat from your house.  For my house, and all Passive Houses in HOT Climates I recommend using a Heat Pump Water Heater.  These babies are pretty awesome.  They use hot air from your house to heat water, and as a by-product the shoot cold air out into your house.  This double-whammy effect turns into a triple whammy, when you realize that this uses a ton less energy, and isn’t too expensive.  These water heaters can cost about $1,500, which is alot for a water heater but not for something that could double as an air conditioner, or hydronic heater.  Remember that in a Passive House your heating and cooling needs are so low that a water heater can easily supply your heating needs, and seriously impact your cooling needs (in a good way).

This is not to say that I’m against Solar of any kind.  If you have the money and motivation, then I am totally for it, and there are a ton of government programs out there that are helping the price come down in both the short and long terms.  I just really like the idea of “Green without Gizmos” and my goal for every Passive house is to make it comparable in cost to a standard home without any longterm paybacks, and easy enough for a drunk monkey to live in.
We built the Walnut House using that as a guiding principle and achieved it.  At most, we spent 1/2 of a percent extra to build it to a Passive House Standard and we have very small energy bills.
Wednesday, June 29, 2011

The Evolving Exterior: Part Deux

A few months ago we wrote this post highlighting the development of the exterior of the first Passive House in Texas.  Here are a few more developments that have recently been completed!  The first photo shows the house in it’s original state before the remodel began…it’s hard to believe how much it has changed!
Built in 1955, this house was ready for some changes!


For a long time the house looked like this: grey cement board covered the exterior.
Base of porch built--preparing the exterior for stucco

Roof of porch built and house covered in white stucco

the front porch; a little more finished

Friday, April 8, 2011

Building a Passive House: The View From Within!

As the building of the first Passive House in Texas continues, the inside of the house is slowly starting to take form.  The house is actually a remodel, and we have faced several design limitations based on elements of the house as we bought it.

A view of the original kitchen.


The main challenge was that the house had asbestos in the exterior siding of one part of the house.  While we originally wanted to demo the entire house and start from scratch, we realized that the asbestos abatement process would be costly and tedious.  For this reason, we decided to leave the original walls up that have the asbestos siding, and simply contain them within the new walls.  This is one of the safest ways to deal with asbestos.


One room in the house: cheap vinal flooring, aging fixtures, paint peeling off the walls, and an overall aged and moldy feel
The house was built in 1955 as a 3 bedroom house with a carport.  In the 70′s, the owner knocked out a side wall of the house and merged it with the carport to create 2 new rooms, which we found out served as a beauty parlor in the neighborhood for many years.  By the time we got the house, it was in pretty bad shape.  For the purpose of our remodel, we would need to rip out every interior wall of the house, bump out the back of the house and replace several exterior walls, build a new roof, and replace half of the foundation.

The back of the house before the bump out.

The entire roof is off, the old framing about to come down!


All the interior walls ripped out, new floors being built, the old roof off and a new one in process!
The back of the house bumped out


Another view of the house, gradually getting framed out!


Monday, January 10, 2011

First Blower Door Test

So I managed to get suuuuper lucky for my first blower door test.  And not because I got a great score.  Right now I’m still at about 1.2ACH 50, or about 900% better than Austin requires for air tightness, but still not good enough by Passive House standards.  What was lucky was that my blower door test was done by Greg from Attic Care, and he lent me his equipment for the weekend so i can spend as much time as I want improving my score.

First of all, I had never even met Greg before today.  Second of all, the blower door, and his thermal imaging gun are worth more than my truck.  Greg was so impressed with the Passive House concept that he is excited to see it work.  Even though my house is already “the tightest he’s ever seen” I’ve still got work to do.  I loaded up on tape, spray foam, and caulk, and I’m ready for tomorrow.  But for anyone in the Austin area needing attic insulation, an energy audit, or blower door tests, I would highly recommend Attic care.

An example of a blower door test

Related Posts Plugin for WordPress, Blogger...